
How to Read Knitting Charts | A Complete Guide on How to Knit from a Chart

How to Read Knitting Charts | A Complete Guide to Knitting from a Chart
Knitting charts are great tools for every knitter, from beginner to advance. They help in visualizing stitch patterns, tracking your progress, and can make it easier to complete more complex designs. However, if you are new to knitting charts, they can seem overwhelming and challenging to read. Here’s how to tackle knitting charts!
What are Knitting Charts?
A knitting chart is a visual representation of a knitting pattern. It is a grid-like diagram that shows each stitch and row, with symbols representing the type of stitch to be completed. Knitting charts are used as an alternative to written instructions, and they can be especially useful for complex stitch patterns or designs.
Each box on the knitting chart represents one stitch, and each row on the chart represents one row of knitting. The symbols in the boxes represent the type of stitch to be made, such as knit, purl, or yarn over. Some charts also include notes or written instructions to clarify any special techniques or instructions. There are different types of knitting charts, including flat charts for knitting in rows and circular charts for knitting in the round.
Helpful Items Mentioned in the Video:
We are Knitters Petite Wool (enter Code MGM3R13ED for $12 off your first order)
**Please note that these are affiliate links and I may receive a commission on items purchased from those links. Those funds help me fund my blog. Thank you for your support! **

Understanding the symbols
Knitting charts use a set of symbols to represent different stitches, and it is essential to understand these symbols before you start reading the chart. The symbols used in knitting charts include:
Most knitting charts have a key that explains the symbols used in the chart. The key is usually located at the bottom of the chart and may include other information such as the stitch pattern repeat and the number of stitches required for the pattern. Take your time to study the key and make sure you understand how to read and knit the symbols used before you start knitting.
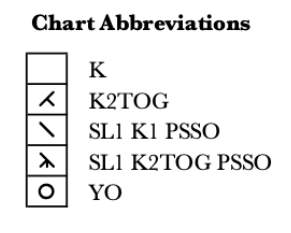
What’s great about knitting charts and symbols is that the chart symbol represents what the stitch will look like, in most cases, so the chart should visually look similar to what the knitted work will look like. For example, a K2tog might be represented as a left leaning slant to the right and when you actually knit a k2tog, the stitch will lean to the right.
How to Read a Knitting Chart
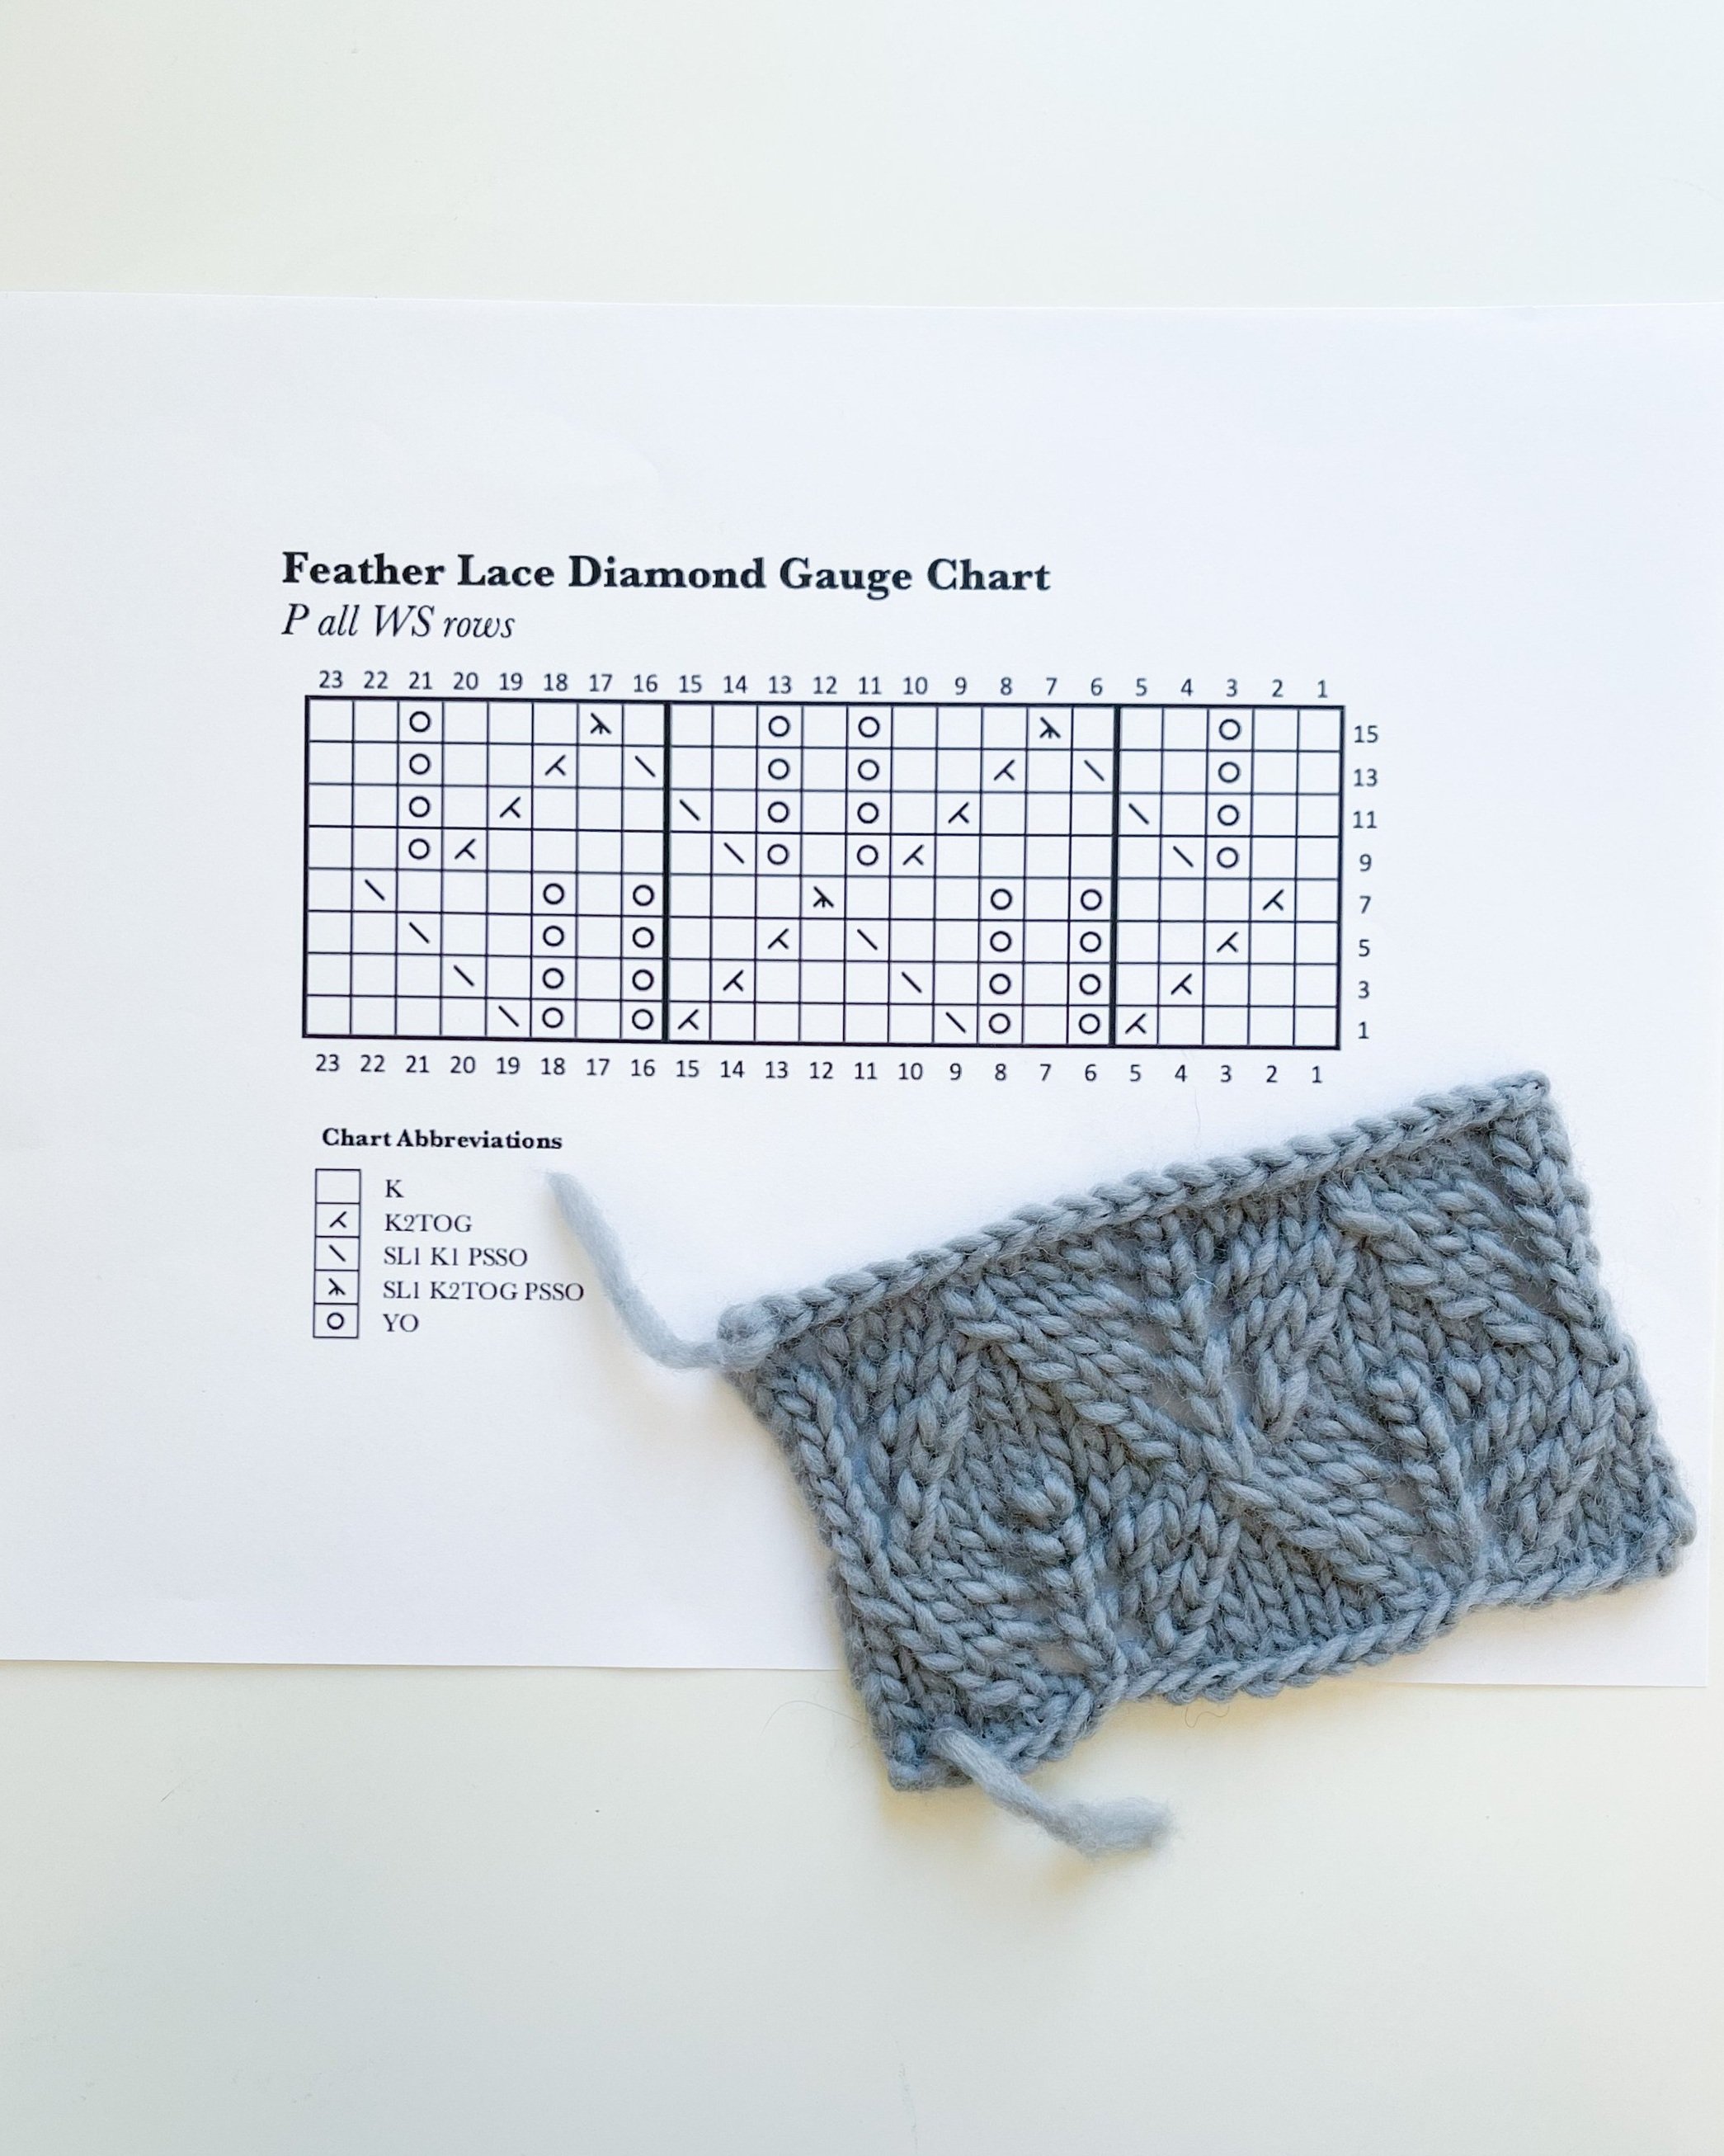
When reading a knitting chart, always start at the bottom right corner of the chart and work your way to the left. The chart is usually read from bottom to top, representing the rows of knitting. Some charts include both the right side and wrong side of the work (if the work is knit flat), while other charts only include the right side of the work. If only the right side is shown, you will just purl all the wrong side rows, in most cases.
To begin, find the first row of the chart and locate the symbol that corresponds to the first stitch of the row. Continue working your way across the row, following the symbols on the chart until you reach the end of the row.
When you get to the end of the row, move up to the next row and repeat the process. If the chart includes shaping or decreases, such as k2tog or ssk, the chart will indicate where these stitches are located. Always make sure to follow the chart precisely to ensure the pattern comes out correctly.
How to Read Knitting Charts | A Complete Guide to Knitting from a Chart
Understanding Repeats
When following a knitting chart, stitch repeats are often enclosed in thick lines to make it easier to identify the pattern and make knitting more efficient. Here's how to follow stitch repeats in a knitting chart between two thick lines:
Locate the stitch repeat: Look for the thick lines that enclose the stitch repeat. The number of stitches in the repeat is usually indicated above or below the lines.
Read the chart: Starting from the right side of the chart, read the symbols inside the repeat from right to left. Repeat the pattern across the row until you reach the end of the stitch repeat.
Repeat the stitch repeat: Once you reach the end of the stitch repeat, start the pattern again from the beginning of the repeat. Repeat the pattern as many times as indicated in the pattern or until you don’t have enough stitches on your work to complete another repeat. Then you’ll just follow the rest of the chart until the end of the row.
Check your work: After completing a few rows, step back and check your work against the chart. Make sure that the symbols on the chart match the stitches in your knitted work. If you notice any discrepancies, go back and correct the mistake before continuing with the pattern.
Repeat the process: Continue following the stitch repeats in the chart for each row of the pattern until you have completed the entire pattern.
By following these steps, you can easily identify stitch repeats in a knitting chart and create beautiful and accurate knitted works. Paying attention to stitch repeats can also help you visualize the pattern and make knitting more efficient, especially for complex stitch patterns or designs.
Helpful Tips for Completing Knitting Charts Correctly
To ensure that your knitted work matches the chart, it is important to pay attention to several factors.
First, check the gauge of your knitting. The gauge refers to the number of stitches and rows per inch of knitted fabric. If your gauge is different from the gauge specified in the pattern, then the final dimensions of the knitted work may differ from the pattern.
Second, make sure to follow the chart accurately. If you miss a stitch or read the chart incorrectly, it can throw off the pattern and design of the knitted work. Therefore, it is important to take your time when reading the chart and ensure that you understand each symbol before you start knitting.
Third, compare your work to the chart frequently. After completing a few rows, take a step back and compare your work to the chart. Make sure that the symbols on the chart match the stitches in your knitted work. If you notice any discrepancies, go back and correct the mistake before continuing with the pattern.

Knitting charts are a valuable tool for every knitter and make it easier to visualize the pattern and keep track of your progress. Understanding the symbols used in the chart and identifying the key is essential before you start knitting. Always remember to read the chart from the right side to the left and keep track of your progress to ensure the pattern comes out correctly. With these tips, you will be reading knitting charts like a pro in no time!